Switching gears for a moment… Let’s go back to the Renaissance as summer- and the Renaissance festival season- approaches. I’ve made two sets of upper-class Renaissance costumes, one in red and one primarily in blue. My very first post outlined the making of these two outfits, and promised details to come. The red set began with a lovely, heavy combed cotton and progressively became fancier as more details were added every year. The blue set, with green and bronze accents, were designed and created as-is, with only a couple of additions over the last few years (such as a chain of office and a tooled leather mug strap). In this post I’ll review what I learned from making the red outfits, and how I applied that to the process of bottom-up construction of the blue set. PS- Yes, we are a couple, and our outfits go together, match, coordinate, whatever. Some people can’t seem to get over that. I made them at the same time and therefore you’ll get information on both women’s and men’s Renaissance clothing construction. Bonus. The red set-
For my husband I made a long Germanic-style doublet and a floppy hat. The pants were being tucked into boots and he’s not much one for poufy pumpkin pants or slops so we went with adding some trim to a pair of black linen pants. Add a white shirt and we were set! My outfit consisted of a square-necked bodice that laced up the back and a cartridge pleated skirt with forepart. A long chemise was the base, and I bought a Paloma hat and trimmed it myself. Both outfits had basic black gimp trim from the start and matching pouches with loops to keep them attached. The center of my bodice and the forepart were this beautiful black and red diamond patterned fabric. Additions: I added panels of the diamond fabric to the front of the doublet and added more ornate trim to jazz it up some, while my skirt got a couple more bands of trim. I also made a new hat for him using the same fabric (he would have needed one custom made anyway- big noggin), and I added tiny beads and “pearls” to the diamond fabric of my outfit. (bodice one year, forepart the next… I don’t love beading) I also hand embroidered/blackworked an authentic pomegranate pattern onto the front of our chemises and hand-stitched lace edging onto the pleats of our neck /collar ruffs (I used black lace for his and gold metallic lace for mine). One year I made an elaborate feather fan with black ostrich feathers, peacock feathers and a fancy dowel I spray-painted gold. My necklace was inspired by period pieces but handmade by me, in the double drape style at the front of the bodice. I also made and beaded a snood for beneath my hat.
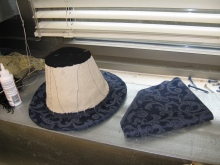
The new outfits: I decided to make a new set from scratch, from shirts to hats. Because, why not? But seriously- it had been several years of adding new things onto old outfits and I felt like I had made a lot of progress in my design skills. I wanted to see what I could do now, and I had the space (my sewing room at work) and time (2 months between the end of the school year and the beginning of the Faire season) to do it. I made a new shirt, pants,hat, pouch and doublet for his outfit and for mine a new hat, chemise, NEW CORSET, bodice, underskirt with forepart, overskirt with cartridge pleating, and little decorations on my shoes. And now, lots of pictures! (With (hopefully) interesting notations. My outfit progression:
It was fun using vintage lace for the pleats on my chemise ruff and cuffs, despite some discoloration from age on the lace- I think the effect is worth it.
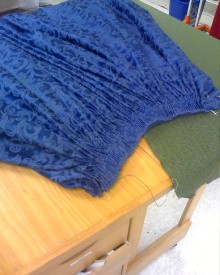
A note on the cartridge pleats- using the drapery pleating trick not only saves you time and looks perfectly authentic, but it also saves some yardage because the sewn in fabric bulks up the pleats.

I made the forepart part of the underskirt, which goes over the petticoat and hoopskirt. I added a “peek-a-boo” panel of the forepart fabric at the bottom.

After the cartridge pleating was done, I attached a waistband and measured the front opening to make sure it would lay flat
The front lower edges of the skirt should be rounded to avoid their flaring out. This can also be mitigated by making it possible to attach the overskirt to the underskirt. I did this by inserting grommets into both and then using ribbon bows to prettily line things up. But all along the length of the skirt, one good gust of wind would expose my white underskirt… so I created a folded panel of fabric which, when attached by means of hidden snaps to the overskirt, would give the impression that the green fabric just goes on and on, because I’m just that wealthy.

For modesty- This folded fabric panel attaches the overskirt to underskirt by way of snaps, to avoid wind-induced fashion mishaps.

And now reverse-engineered, with fashion fabric and piping, for a fitting (yes, the actual fitting moment included the blue skirt)
Hmm. It would appear that those are all the pictures I took of the bodice in progress. So without further ado, moving on to HIS outfit! I put boning in his doublet because it is period, and it helps the doublet to keep its shape. I also put in grommets at the waist of the pants and bottom f the doublet so the two can be laced together, keeping them in place even more securely.

I decided to insert all sorts of piping into his doublet. It’s a pain, I wouldn’t recommend it.
Now I actually do have something to add here- I was torn on how to attach the velvet ribbon. I felt that machine stitching it would be heavy looking, and very difficult to keep even along the edges. But I’ve had issues with fabric glues discoloring and showing through on the surface. So I chose to add pearl beads… sewing them on at regular intervals is decorative, but actually attaches the ribbon to the doublet. I added some carefully chosen points for some fabric glue, and voila!

And figured that I should really add more stuff to it, like individually piped graduated epaulet panels.

I can’t forget his pants! Although I did up to this point with the camera. 😦 Well, they were basically plain breeches that I added piped and lined strips of blue to. Then of course the waistband and over-the-knee cuffs were banded in blue as well.

New pouches to top things off…with belt straps the blue one has longer loops to hang from, as it attaches to a special waistband strap on my blue overskirt and I didn’t want it to interrupt the line of peplum on my bodice. )
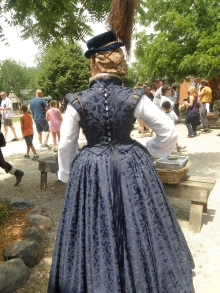
The Grand Finale! Done with everything, and here are some pictures. I apologize for skimming over some items, like the snood, the bloomers, the finishing of the bodice, the men’s shirt (thought it’s really just like a women’s chemise but shorter)- when I chronicled the making of these items, this blog was still just a sparkle in my eye. **On the circular hand fan** This is a period style of hand fan… I found the tutorial (three years ago when it was made) online, and cannot find it to link to it now. If there IS interest, I’ll do a special post addressing its construction, and I’d probably add in the ostrich fan construction along with it.


[…] details at this […]
This is BEAUTIFUL! Question though, that blue fabric! Where did you get it?
Thank you! The fabric is actually from Jo-Ann Fabrics… as recently as a few weeks ago they still had it, though I think it was in their clearance section.
I like both the red and the blue renaissance gown!! They look good for renaissance festival season. I would love to own a gown similar to the blue one. Also which fabric is of the red gown? for blue one you have mentioned in the above comment.It looks nice…
Russ, thank you for your kind words! The red costumes are made from a combed cotton. It is also a fabric from the upholstery section at Jo-Ann Fabrics (about 9 years ago), so it’s good & heavy, but it’s 100% cotton so it breathes well.
[…] I’ll wear ridiculous amounts of fabric in ridiculous temperatures at the Renaissance Faire (proof!), but those are made with natural fibers, overwhelmingly, and that really does make a […]
[…] and participated in fashion shows (including Fashion Week here in Milwaukee), been an actor at the Bristol Renaissance Faire for a few summers, been an active member in the tri-state area Steampunk community for over a […]