
The beginning of the second dress I made, now with the poorest choice ever for piping fabric!!
So, I had planned to do a series of posts about my experiences doing the Artistic Intensive in the Costume Shop at the Florentine Opera Company… I was terribly excited when they said I could participate! However, the absence of any structure and a distinct lack of communication led to, basically, a disappointing experience.
Upon arrival I was foisted upon a draper who said she’d never done anything like this before. After a day of stitching I asked about the program setup & was told that I was stitching in exchange for the experiences to come- stitch first!
As the costume shop portion of the intensive was finishing (circumstances kept me from participating during the week of production; my immediate relation of those circumstances resulted in the implication that I was unprofessional), I voiced my concerns that all I’d done was stitching & hadn’t learned anything new, I was informed that I should be learning by osmosis, that “being in the environment is a learning process”.

The magic of osmosis!- Who needs syllabi, lesson plans or rubrics anyway?
Yes, and being at a sewing machine is usually a paid process. Now, I didn’t expect a step-by-step learning process, as this was created in the veins of a “professional development program”, but I did expect some semblance of structure, just something, from the term “program”. Turns out that they had never done the “Intensive” in the costume shop before, the closest they’d come was a split between costumes and wigs/makeup.

Yay internships!
I met some great people, and (in making 2 dresses) practiced some finishing techniques that usually aren’t a part of period fashion, so I guess it wasn’t a total loss. But it feels like a wasted opportunity because the program could be great, and it isn’t even a “program” in any sense of the word.
SO.
On to the new dress I’ve been promising you!!
Now, I happened to receive 13 yards of this beautiful, heavy, steel blue satin from my mom when she was visiting- she got it for a steal after seeing it and thinking of me! I took it to my sewing room and starting pulling out possible accent fabrics, and rediscovered 3 yards of an imported silk brocade in a deep gold dragon pattern that I’d bought years ago, with the original intention of making a gold silk corset dress. Good taste won out on that one, and there the silk sat for a very long time. But next to the blue satin it looked rich and, to make it even better, I had some perfectly matched dark gold “silkessence” from drapes I made in another life.
It was the beginning, and time to come up with a design. Though the dragon pattern would influence the direction, going in I simply knew I wanted to do a day dress with a high neckline.
My inspiration was drawn from a few sources; film, historical examples, even an online mention of a technique I’ve never used before.
Some inspiration pics:

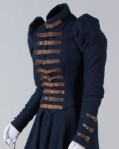


The first two images are extant period pieces, the third is a reproduction of a costume from the film “Bram Stoker’s Dracula”, and the fourth is an image from the film “Moulin Rouge”. You will be able to identify the elements I borrowed from these looks to create a clean design, pulling inspiration from both military styles and far east influences. For the skirt, I came up with an original trim design, and used a period pattern from a book.

However, as you can see from this pattern, the back is a mystery…. from the instructions it sounds as if the back is simply gathered. I like to create visual interest in the back of my looks, however, and a gather just doesn’t do it for me. After much research, I discovered a little post about burnous pleats on Truly Victorian’s site. And it was the perfect addition- elegant yet echoing the lines of the pleated fan shape which would adorn the back of my jacket. Hooray! So what if I’ve never seen/made one before!
So, here’s the skirt process:

With burnous pleats pinned in place.
The waistband- french seams.

Very important- my dress form is set to my corseted measurements


Complete- Note that the hem is done WITH the bustle that I intend to wear on the dress form! (I wasn’t being too picky with the hem because the trim going over it is about 4″ deep.)
Just look at the graceful drape of that pleat! You can also adjust the angle of that pleat so the triangles formed by it are larger or smaller. I really am just in love with that burnous.
Here is the tab trim, more on that later, maybe. 🙂

Now that the skirt was done, I could move on to the jacket. I had my plan- I would start with a pattern I’ve used before, for the summer dress and for the blue and yellow dress, but alter it to make it high-necked, and create a hidden front closure beneath a decorative panel. So I pulled out the pattern & began making adjustments.


The left image is the original, and the right is the new one, before the mock up. I made some anticipatory adjustments based on my previous experience with this pattern.


And still had to make adjustments- I took too much from some waist seams and not enough from the back/chest area. (I had lost 30 lbs since the last time I’d used this pattern) On the right, the adjustments were made to the pattern before cutting out all layers (with a rotary blade, it’s hard to get accuracy through multiple layers with scissors). And then, fun:


I flatted every piece- the fashion fabric, lining and interlining, because I had decided to sew the jacket with exposed finished seams, for easy future alterations (which is good, because a few months later, I’ve lost about another ten pounds and need to take the waist in a tad). Flatting the pieces keeps them from moving around/stretching independently of each other as you sew them, ensuring all your edges line up.


The first fitting went well, if a little full through the hips. It was imperative to create the front closure, though, before doing any further fitting.

Skipping a little ahead here (I forget to take pictures when I’m making a lot of progress, which is why there are virtually no images of the long, complicated process of the trim going together). I put in a zipper, facing one side of the hidden front with blue. (If I did it again, I’d probably face both sides with blue just because it looks nicer, but practically speaking, no-one will ever see it.) I used the gold silkessence on the front panel, gathering a double thickness to be sure it wasn’t too thin.

Sewed it in, shaped and pressed the bottom- those are simply two triangular shapes pleated inward. I attached the front panel at the far side with several hooks and thread chain eyes. I also made some bias tape for the hem and cuffs, and custom piping for the skirt hem and silk sleeve bracers.


To make the bands, I took measurements across the width of the front panel at the correct heights, reinforced the silk with interfacing, drew the bands, cut, stitched, pressed, then placed them onto the bodice.

Like so.

(At this point, yes, the front pleat points were uneven & driving me nuts, but I resolved not to fix them until later. Who knows, maybe it wasn’t that bad?)
I made the fan for the bodice back, interfacing both the fashion fabric and the lining. Just a simple rectangle. I’m keeping the folds pinned in place when not being worn, to keep them crisp.


Finishing touches, added a hat, and there you go!

I purchased a felt hat base in the right shape from Zulily (it was not advertised as a base, it was being pushed as a finished hat… with some black ribbon and a piece of netting hot glued onto the grey felt base), and made a pattern from it to cover it in satin. As a matter of preference, I don’t use glue in making my hats- I stitch it all. I added a length of millinery wire to the edge as well. After the covering was on, it was really just draping some gold fabric and curling the 10 ostrich feathers.I had an adorable old pin that I fixed up with enamel paint, and after everything else was done I added a couple chain stitch loops at the sides for securing the hat with bobby pins.


And one of my former students modeled it at the Milwaukee Public theater’s 40th Anniversary “Metamorphosis Steampunk Circus” fashion show, along with myself and another student.

